


Introduction
You don’t need a professional camera, a studio full of expensive equipment, or years of photography experience to take amazing cosplay photos. In fact, some of the most memorable cosplay images are captured with simple gear and a solid understanding of the fundamentals. While camera quality can certainly help, it’s the photographer’s eye—not their budget—that ultimately creates photos people remember.
Great cosplay photography is about telling a story. Every costume represents hours—sometimes hundreds of hours—of crafting, sewing, painting, styling, and preparation. Your job as a photographer is to showcase that hard work while bringing the character to life through thoughtful composition, lighting, and posing.
If you’re just getting started, focus on three things above everything else: respecting the cosplayer, mastering your lighting, and creating images that capture the character instead of simply documenting the costume. These principles consistently separate average convention snapshots from photos that truly stand out.
In this guide, you’ll learn what makes cosplay photography unique, how to work respectfully with cosplayers, how to find flattering light, choose better backgrounds, direct natural poses, improve your composition, and edit your photos without overdoing them. Whether you’re photographing friends, attending your first convention, or simply looking to sharpen your skills, these beginner-friendly tips will help you capture cosplay with more confidence and creativity.

What Makes Cosplay Photography Different From Regular Portrait Photography?
At first glance, cosplay photography may look like traditional portrait photography, but there’s an important difference: you’re not simply photographing a person—you’re photographing a character. The goal isn’t just to create a flattering portrait; it’s to capture the personality, story, and atmosphere behind the costume.
Understanding this distinction is one of the biggest mindset shifts for beginner photographers. Once you stop thinking about “taking pictures of people” and start thinking about “bringing fictional characters to life,” your photography naturally becomes more engaging and cinematic.
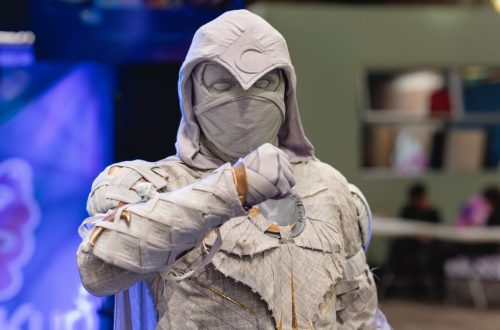
Photograph the Character, Not Just the Costume
A great cosplay photo should instantly communicate who the character is—even before someone notices every detail of the costume. That means encouraging expressions, poses, and body language that reflect the personality of the character being portrayed.
For example, a superhero might stand confidently with their shoulders back and chin raised, while a fantasy warrior could grip their weapon in a battle-ready stance. A mischievous anime character may call for playful expressions, while a mysterious villain often benefits from dramatic lighting and intense eye contact. These small choices transform a simple portrait into visual storytelling.
Props also play an important role. Instead of letting a sword, shield, staff, or blaster hang naturally at the subject’s side, encourage the cosplayer to interact with it. Holding, aiming, casting, or preparing for battle creates movement and makes the character feel believable rather than posed.
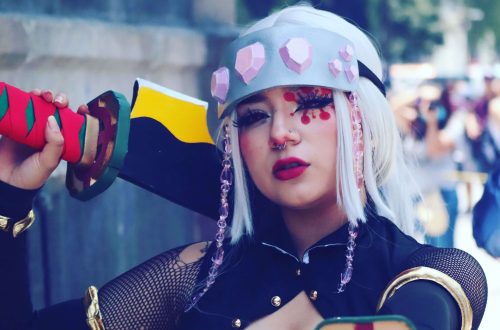
Highlight the Craftsmanship
Cosplayers invest an incredible amount of time into every aspect of their costumes—from carefully styled wigs and handcrafted armor to intricate makeup, weathered props, and tiny accessories that casual viewers might overlook. Your photos should celebrate that craftsmanship.
Start by capturing several full-body shots so viewers can appreciate the costume as a complete design. Then move in closer to photograph the details that make the cosplay unique. Close-ups of armor textures, embroidered fabrics, painted props, makeup effects, contact lenses, jewelry, or handcrafted accessories help showcase the dedication behind the finished look.
By combining wide shots with medium portraits and detailed close-ups, you’ll create a gallery that feels complete while giving the cosplayer a variety of images they can proudly share across social media or include in their portfolio.
Always Start With Permission and Communication
Technical skills can improve over time, but one quality separates great cosplay photographers from everyone else before a single photo is taken: respect. Building trust with the person you’re photographing not only creates a more enjoyable experience, but it almost always leads to stronger, more natural images.
A few moments of communication before the camera comes out can make the entire photoshoot smoother for both you and the cosplayer.
Ask Before Taking Photos
At conventions, photoshoots, and public cosplay events, it’s considered proper etiquette to ask for permission before taking someone’s photograph. While many cosplayers enjoy having their costumes photographed, they should always have the opportunity to decide when, where, and how they’re photographed.
A simple introduction followed by, “Would you mind if I took a few photos of your cosplay?” is usually all it takes. If they decline, thank them politely and move on. Respecting their decision helps maintain the welcoming atmosphere that makes cosplay communities so enjoyable.
Asking first also benefits you as the photographer. Once someone agrees, they’re far more likely to face the camera, adjust their costume, prepare their pose, and fully step into character—resulting in noticeably better photos than a rushed candid shot ever could.
Talk to the Cosplayer Before Shooting
Once you’ve received permission, spend a minute getting to know the character they’re portraying. Ask if they have a favorite pose, a signature expression, or a specific part of the costume they’re especially proud of. These quick questions often reveal creative ideas you may never have considered on your own.
Many experienced cosplayers already know which poses suit their character best, while others appreciate a photographer who takes an interest in the work they’ve invested in their costume. You can also ask if there are any props, armor details, or handcrafted accessories they’d like featured in the final images.
This brief conversation creates a collaborative experience instead of simply pointing a camera at someone. The result is a more relaxed subject, stronger character performances, and photos that feel authentic to both the cosplayer and the character they’re bringing to life.
Use Better Lighting for Better Cosplay Photos
Lighting has more impact on your cosplay photos than almost any camera upgrade you can buy. Even an entry-level camera or modern smartphone can produce fantastic results when the light is soft, even, and flattering. On the other hand, poor lighting can make an incredible costume look flat, washed out, or filled with distracting shadows.
Fortunately, beginners don’t need expensive studio lighting to improve their images. Learning how to recognize good natural light—and avoid bad lighting—is often enough to make your cosplay photography look dramatically more professional.
Why Natural Light Is Perfect for Beginners
Natural light is one of the easiest and most forgiving light sources available. Soft daylight helps preserve costume colors, reduces harsh shadows, and creates flattering skin tones without requiring complicated equipment.
Some of the best places to photograph cosplayers include:
- Open shade beneath trees or building overhangs
- Bright but cloudy or overcast days
- Large windows and doorways that allow indirect sunlight inside
- Outdoor locations shortly after sunrise or before sunset for softer, warmer light
These environments provide even illumination across the face and costume while allowing intricate details like armor, fabrics, wigs, and props to remain clearly visible.
Lighting Mistakes to Avoid
One of the biggest beginner mistakes is photographing subjects in harsh midday sunlight. Strong overhead light creates deep shadows under the eyes, nose, and chin while causing bright highlights that can wash out costume details.
Built-in pop-up camera flashes often create similar problems by producing flat, unnatural lighting that removes depth from the image and introduces harsh reflections on shiny materials like armor or props.
Backlighting can also be challenging for beginners. While placing the sun behind your subject can create beautiful effects, it frequently leaves the face too dark unless additional lighting or reflectors are used. Until you’re more comfortable controlling exposure, it’s usually easier to keep the primary light source in front of or slightly beside your subject.
When Artificial Lighting Makes Sense
Although natural light is an excellent starting point, there are situations where artificial lighting becomes useful. Indoor convention centers, evening shoots, or dark locations often require additional light to properly expose your subject.
External flashes produce softer, more directional light than built-in flashes, while softboxes help spread light evenly across the costume to reduce harsh shadows. Reflectors are another beginner-friendly tool that bounce existing light back onto the subject, brightening facial features without requiring expensive equipment.
As your photography skills grow, you’ll discover how combining natural and artificial light can create dramatic cinematic effects. But when you’re just starting out, mastering available light first will give you the strongest foundation.
Choose a Background That Supports the Character

An incredible cosplay can lose its impact if the background is cluttered or distracting. Even the most detailed costume struggles to stand out when it’s surrounded by crowds, bright signs, or unrelated objects competing for attention. Fortunately, improving your background often requires nothing more than taking a few extra steps before pressing the shutter.
A thoughtfully chosen location strengthens the story you’re trying to tell, helping viewers focus on the character rather than everything happening behind them.
Avoid Distracting Backgrounds
Convention centers are exciting places, but they’re rarely perfect photography locations. Crowded hallways, food vendors, trash cans, exit signs, and people walking through your frame can quickly pull attention away from the subject.
Before taking the photo, scan the area behind the cosplayer. Ask yourself whether anything in the background distracts from the costume. Sometimes moving only a few feet to one side or changing your shooting angle is enough to eliminate visual clutter and create a much cleaner composition.
If possible, look for simple walls, architectural features, landscaped areas, or quieter corners of the venue where the cosplay naturally becomes the center of attention.
Match the Environment to the Character
Backgrounds don’t just remove distractions—they help tell the character’s story.
Fantasy characters often look most believable in forests, gardens, stone pathways, castles, or parks with natural scenery. Superheroes and comic book characters frequently fit modern city streets, rooftops, or industrial architecture. Meanwhile, cyberpunk and science-fiction cosplays shine against metallic structures, futuristic buildings, colorful neon lighting, or urban environments after dark.
You don’t need the perfect movie set. Choosing a location that complements the character’s world is often enough to make the final image feel more immersive and cinematic.
Blur Busy Backgrounds
Sometimes you can’t escape a crowded convention floor. That’s where depth of field becomes one of your best creative tools.
Using a wider aperture—or Portrait Mode on many smartphones—creates a shallow depth of field that gently blurs the background while keeping the cosplayer sharp. This separation naturally draws the viewer’s eye toward the subject and minimizes distractions that can’t be removed physically.
The result is a cleaner, more professional-looking image that emphasizes the costume instead of the environment.

Master Character-Driven Posing
Lighting and backgrounds create the stage, but posing brings the character to life. The strongest cosplay photos don’t simply show someone wearing a costume—they convince the viewer they’re looking at the character themselves.
Helping your subject pose naturally is one of the fastest ways to elevate your photography, even if you’re using basic equipment.
Pose Like the Character
Every fictional character has a unique personality, and their body language should reflect it.
Heroes often appear confident, standing tall with open shoulders and determined expressions. Villains tend to use stronger eye contact, dramatic posture, and more intimidating stances. Action-oriented characters look best mid-motion or prepared for battle, while elegant fantasy or royal characters often benefit from graceful hand placement and refined posture.
If you’re unsure what pose to suggest, ask the cosplayer what signature stance the character is known for. Many already have favorite poses prepared, making collaboration easy.
Make Props Part of the Story
Props shouldn’t simply be carried—they should become part of the performance.
Encourage the cosplayer to naturally interact with their accessories. A sword can be drawn into a battle stance, a shield can be raised defensively, a magic staff can appear to cast a spell, or a comic book hero can prepare for action with fists clenched.
Small movements create energy within the frame and help transform a static portrait into a believable scene.
Experiment With Camera Angles
Changing your shooting angle can dramatically alter how powerful a character appears.
Low-angle shots make superheroes, armored warriors, and larger-than-life characters feel taller and more intimidating. Eye-level portraits create a balanced, natural perspective that’s ideal for emotional moments or detailed costume showcases. Close-up shots highlight facial expressions, makeup, contact lenses, and intricate costume craftsmanship that viewers might otherwise miss.
Instead of taking one photo from one position, move around your subject and experiment. You’ll often discover an angle that tells the story far more effectively.
Improve Your Composition
Composition is what transforms a snapshot into a photograph. It determines where viewers look first, how their eyes move through the image, and which details receive the most attention.
Fortunately, improving composition is less about memorizing photography rules and more about intentionally directing the viewer toward the character.
Fill the Frame With the Subject
Avoid leaving large areas of empty space unless the environment contributes to the story. Filling more of the frame with the cosplayer allows viewers to appreciate the costume while creating a stronger visual connection with the character.
Remove Visual Distractions
Before taking each photo, quickly scan the edges of your frame. Crooked signs, tree branches, poles, backpacks, water bottles, or people walking behind your subject can unintentionally steal attention from the cosplay.
A few seconds spent adjusting your framing often saves far more time during editing.
Use Leading Lines to Guide the Eye
Look for natural lines created by hallways, fences, staircases, sidewalks, or architecture that direct the viewer’s attention toward the cosplayer.
These subtle compositional elements help create images that feel more polished without requiring complicated camera techniques.
Capture a Variety of Shots
Instead of taking twenty nearly identical photos, build a complete gallery by mixing different compositions.
Include:
- Full-body portraits that showcase the complete costume.
- Medium shots that balance character and surroundings.
- Close-ups highlighting facial expressions and emotion.
- Detail shots featuring armor, props, accessories, makeup, wigs, and handcrafted costume elements.
This variety gives the cosplayer more usable images while demonstrating your versatility as a photographer.
A Simple Beginner Cosplay Photography Workflow

When you’re photographing multiple cosplayers at a convention, it’s easy to feel overwhelmed. Having a repeatable workflow helps ensure you don’t overlook important details.
Follow this simple process for every shoot:
Step 1: Introduce yourself and ask permission before taking photos.
Step 2: Find soft, even lighting whenever possible.
Step 3: Choose a clean background that supports the character.
Step 4: Direct poses that reflect the character’s personality.
Step 5: Capture multiple angles along with several close-up detail shots.
Step 6: Review your images on the camera screen and make adjustments before ending the session.
Repeating this workflow builds confidence and eventually becomes second nature.
Edit Your Photos Without Overdoing Them
Editing should enhance your photography—not completely transform it. A well-composed image captured in good light usually requires only subtle adjustments to look polished.
Basic Edits Every Beginner Should Learn
Start with simple improvements like adjusting exposure, increasing or decreasing contrast, correcting white balance, and fine-tuning colors so they accurately represent the costume.
Small edits often produce the most natural-looking results.
Clean Up Small Distractions
Minor background cleanup can remove objects that accidentally slipped into the frame, while subtle blemish removal helps polish portraits without making them look artificial.
Focus on improving the image rather than changing it entirely.
Keep the Costume Looking Real
Avoid excessive filters, oversaturated colors, or aggressive skin smoothing. These edits can erase costume textures, distort paintwork, and make handcrafted details appear unrealistic.
The goal is to showcase the cosplayer’s craftsmanship—not hide it beneath heavy editing.
Common Beginner Cosplay Photography Mistakes
Everyone starts somewhere, but recognizing common mistakes early can dramatically speed up your improvement.
Some of the most common beginner errors include:
- Taking photos without first asking permission.
- Shooting in harsh midday sunlight that creates deep shadows.
- Ignoring distracting backgrounds.
- Taking only one pose instead of encouraging variety.
- Over-editing images until costumes no longer look authentic.
Avoiding these simple mistakes immediately makes your work look more polished and professional.
Quick Cosplay Photography Checklist
Before you press the shutter, run through this quick checklist:
✔ Ask permission before taking the photo.
✔ Find soft, even lighting.
✔ Choose a clean background.
✔ Match the pose to the character.
✔ Capture multiple angles.
✔ Photograph important costume details.
✔ Review your images before moving on.
These habits only take a few extra moments, but they consistently lead to stronger photographs.
Final Thoughts
Great cosplay photography has very little to do with owning the newest camera or the most expensive lens. The images people remember are the ones that capture personality, craftsmanship, and the spirit of the character.
As a beginner, your biggest improvements will come from respecting the cosplayer, finding flattering light, choosing thoughtful compositions, and encouraging authentic, character-driven poses. Master those fundamentals first, and every future photoshoot will become easier and more rewarding.
Most importantly, keep practicing. Visit conventions, experiment with different locations, test new lighting conditions, and challenge yourself to shoot from fresh angles. Every cosplay session teaches something new, and with consistency, you’ll develop both the technical skills and creative eye needed to create images that truly bring fictional worlds to life.